3 – Adding your Employees
To start adding your users, head over to the ‘Manage Users’ page within ‘User Admin’ and follow the steps below:
Account Details
-
- Click the ‘Add a new User’ button. – If the button isn’t displaying, then you may need to increase your user count
- Enter the Username – This needs to be globally unique, an email address is ideal.
- Enter the Password – Displayed as asterisks for security, you can hit ‘Send Password’ to email this employee their current password, or type a new password and hit ‘Save’ below to reset their password.
- Enter the Name – This is the full name of the employee.
- Enter the Email Address – This is but adding an email allows them to receive notifications from the system of their requests. A work or private email address such as @hotmail or @gmail can be used.
- Enter the Employee Reference – This has no effect in LeavePlanner but can be used to store additional info.
- Enter the Leave year Start Date – This only appears when you have the leave year set on an individual employee basis.
- Enter the Employment Start Date – The day this employee joined the company, LeavePlanner will calculate accrued holiday.
- Enter the Department – This is the department the employee belongs to, set these up in Organisation Structure.
- Enter the Access Level –
- Employee is the standard Access Level within LeavePlanner with the least visibility and access
- Manager level gives a user the ability to view the summary details and raise requests on behalf of employees in their own department (and sub–departments).
- Department Administrators can access the User Admin menu; there they can set up users, allowances and working patterns, manage Low Cover Protection and generate Bulk Leave Request but only for employees in their department. They can request on behalf of any user in their department (and sub–departments).
- System Administrators have full access to configure LeavePlanner; customise the Leave Settings, add users and departments. They can also see all users and override any authorisation process.
- Default Planner Access – If there are restrictions on which departments appear in an employees calendar you can override them her. And/or assign a different level of access to certain other departments.
- Enter the Intranet Details – If your organisation uses an auto-login URL from an Intranet page, you can set the DOMAINUsername here for each user.
- Hit the ‘Next’ button to move to the Leave Authorisation tab

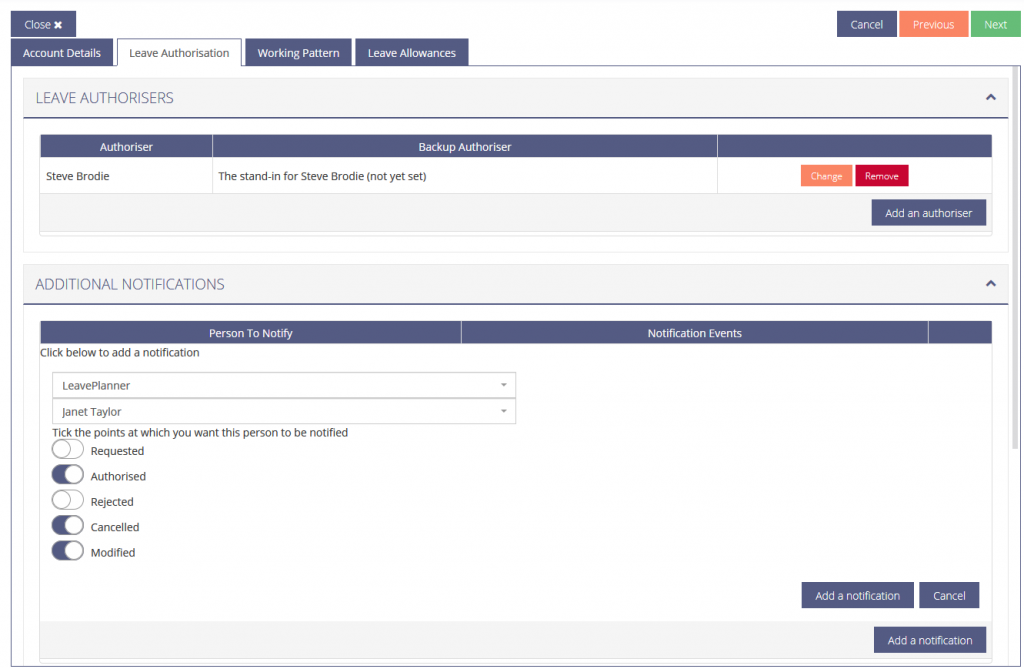
Leave Authorisation
Note: Authorisation can now be set per department, or Leave Type – For more information click here: Authorisation by Department Authorisation by Leave Type
To set up individual authorisers per employee, follow the steps below:
-
-
- Select the Authoriser – Choose the person who will authorise the current employee’s requests. You can filter by department.
- Action if authoriser is on leave – Decide what happens when your selected authoriser is on leave.
- No-one – The request will wait until the chosen authoriser returns from leave. Administrators are able to accept any requests if required.
- Their stand-in – Select to choose the default Stand-in for this authoriser (this is set on the authoriser’s manage user page).
- A specific person – Choose an individual, who wouldn’t normally by the stand-in for this authoriser.
- Action if authoriser is on leave – Decide what happens when your selected authoriser is on leave.
- If you want anyone additional to be notified, you can select ‘Add a notification’ and choose a user in the same way that you add an authoriser. The notifications are triggered based on selecting from the following events in LeavePlanner.
- Requested – As soon as a user submits a request.
- Authorised – When leave has been approved for this user.
- Rejected – If a request has been denied by an authoriser.
- Cancelled – When a request is deleted.
- Modified – If part of the request is removed.
- Finally, if this user is an authoriser, you can set ‘Use a Stand-In’ to pick an employee to authorise requests in their absence.
- Hit the ‘Next’ button to continue to Working Pattern.
- Select the Authoriser – Choose the person who will authorise the current employee’s requests. You can filter by department.
-
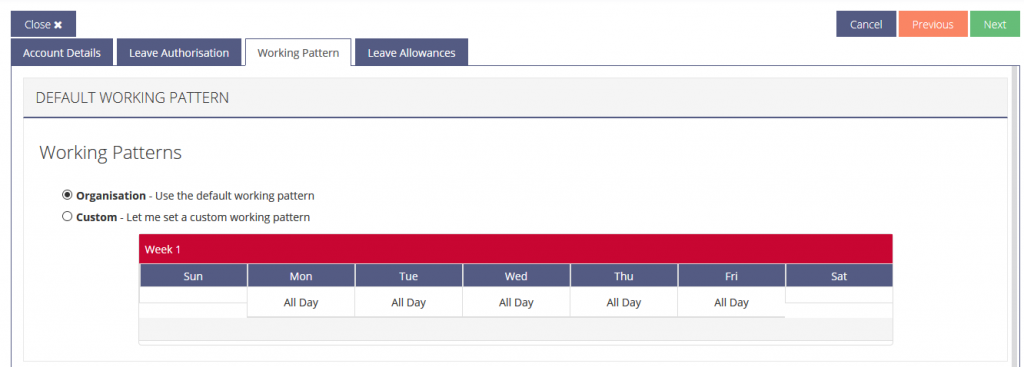
Working Pattern
-
-
- If this employee works a different pattern to the organisation default, set it to Custom and modify it here.
- Right-click to edit or delete the default periods, and hover to add a new period.
- Hit ‘Next’ to move on to Leave Allowances.
- If this employee works a different pattern to the organisation default, set it to Custom and modify it here.
-
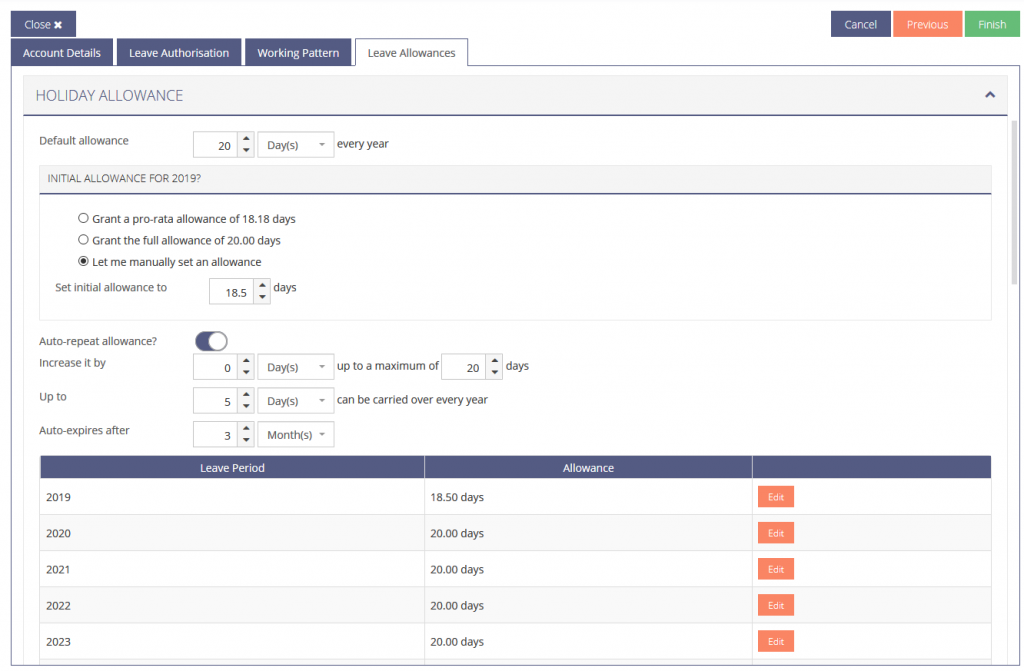
Leave Allowances
-
-
- Choose whether this employee uses the default organisation public holidays.
- Enter the full starting allowance for this employee.
- LeavePlanner will calculate the pro-rata allowance, either select this, or choose the full allowance or a custom figure.
- Choose Auto-repeat allowance to automatically set up the next leave year for this employee.
- If you have incremental leave, enter the per year and maximum figures here for this employee.
- Set how many days this employee is allowed to carry over into the next leave year.
- If allowing carried leave, you can set Auto-expires after to make this leave expire after a time.
- LeavePlanner will give you confirmation of the allowances for this and future Leave Periods.
- If you have a Custom Leave Type set up with an allowance, repeat the allowance setup steps.
- Hit Finish to add this employee into the system.
-