2.1 – Manage Users
The manage users page, allows you to choose a user and modify their details, authorisation steps, working pattern and allowances.
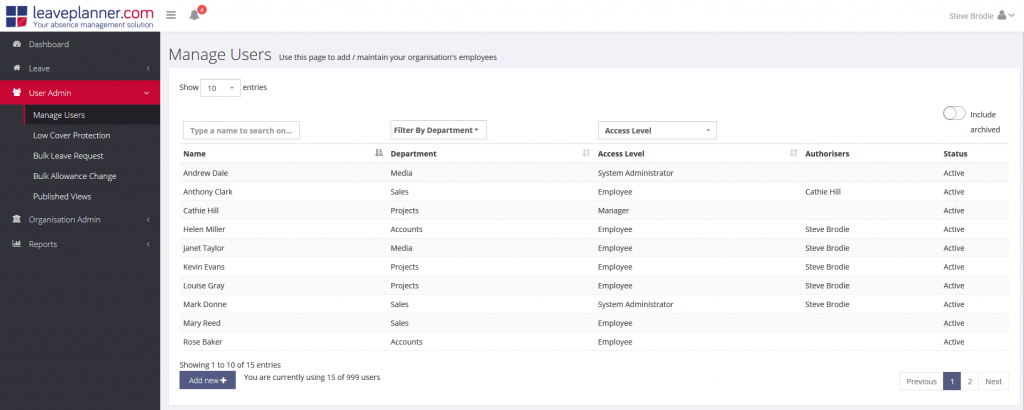
Manage User Options
Department selector
Use the selectors here to choose which of your departments are shown in the calendar.

Include Archived
Choose ‘Include Archived’ if you want to include users that have left the company and been archived (rather than deleted). This is useful if you want to modify details after someone has left.
User List
The user list displays all of the users you have access to. Click on the name of an employee to modify their information. You can start typing a name in the box to filter the list and quickly find the user you want to check. You can see the currently selected user at the top of the right-hand window.

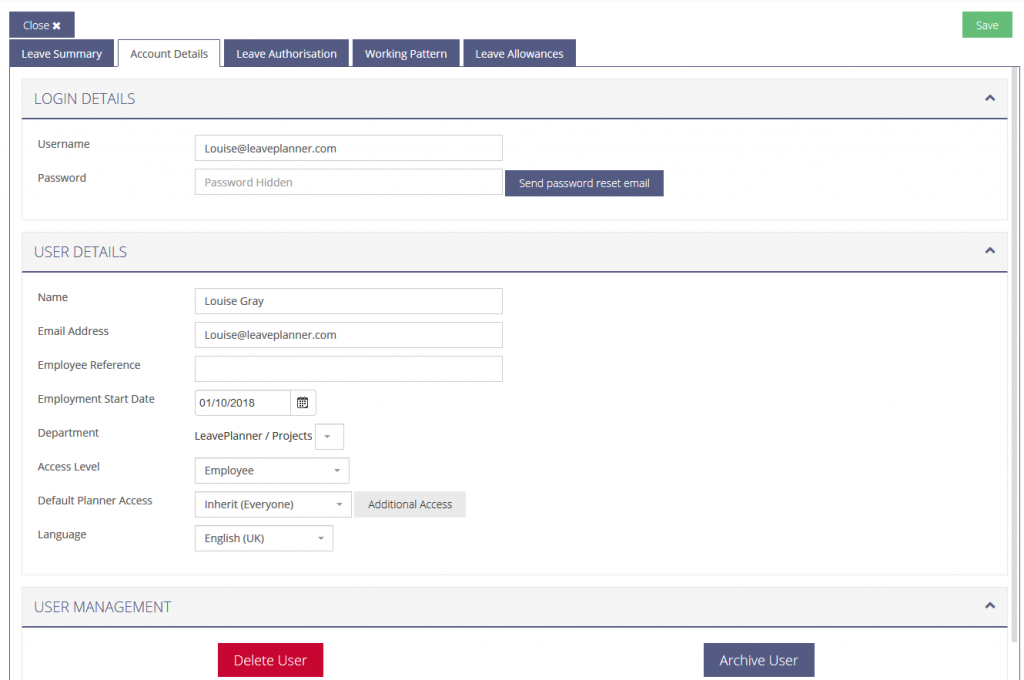
Account Details
The Account Details page contains the basic information for the currently selected employee:
- Username – Usually set to the persons email address, if you need to change the username, here is where you do it.
- Password – Displayed as asterisks for security, you can hit ‘Send Password’ to email this employee their current password, or type a new password and hit the ‘Save’ button below to reset their password.
- Name – This is the full name of the employee
- Email Address – This is now optional, but adding an email allows them to receive notifications from the system of their requests.
- Employee Reference – This has no effect in LeavePlanner, but can be used to store additional info.
- Leave year Start Date – This only appears when you have the leave year set on an individual employee basis.
- Employment Start Date – The day this employee joined the company, LeavePlanner will calculate accrued holiday.
- Department – This is the department the employee belongs to, set these up in Organisation Structure.
-
Access Level – Defines what this employee is able to do within LeavePlanner, you can choose from four different access levels:
- Employee is the standard Access Level within LeavePlanner.
- Manager gives a user the ability to view summary details and request on behalf permissions for their department (and sub–departments).
- Department Administrators can access the User Admin menu; there they can set up users, allowances and working patterns – also manage Low Cover Protection and generate Bulk Leave Request. They can request on behalf of any user in their department (and sub–departments).
- System Administrators have full access to configure LeavePlanner; customise the Leave Settings, add users and departments. They can also see all users, and override any authorisation process.
- Intranet Details – If your organisation uses an auto login (single sign on) from a corporate Intranet page, you can set the DOMAINUsername here for each user.
Archive/Delete User
In this tab you also have the options to Archive and Delete (as well as Save changes). To set an end date for a user that has left the company, hit the Archive button and follow the steps. The leaving date can be in the future and the employee will be active until that date. LeavePlanner will help you calculate the final allowance figures for this person. If you have made a mistake, or wish to do so for data protection purposes, you can Delete the user record from LeavePlanner. When doing so you can no longer view them in the system and all associated data is permanently deleted, this is not recoverable. When an employee is archived or deleted, they will no longer contribute to your licence usage for LeavePlanner (shown in Organisation Settings).
Leave Authorisation
The Leave Authorisation tab contains the settings for the selected employee’s authorisation steps, additional notifications, and authorisation stand-in (if this user is responsible for authorising requests).
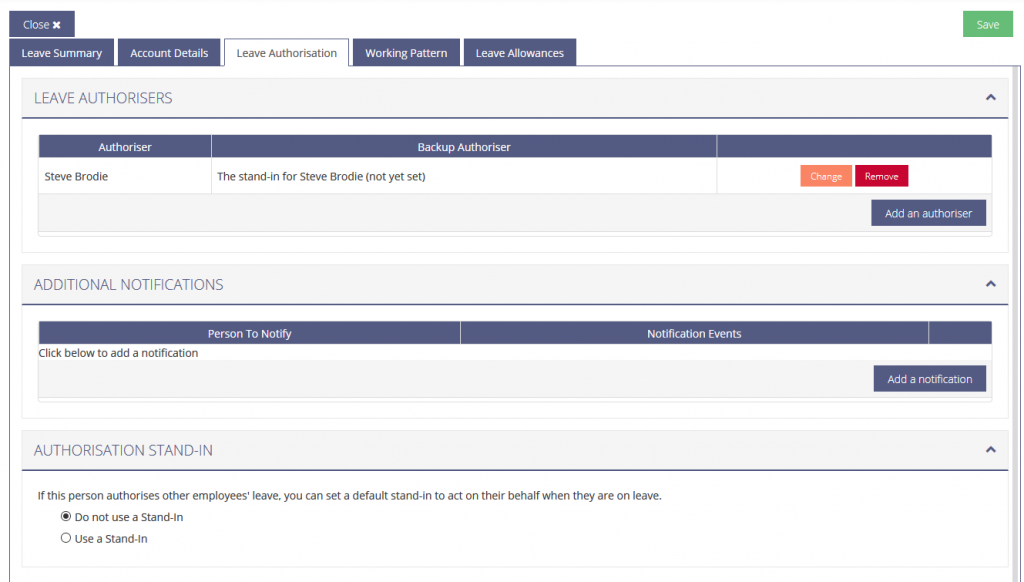
Leave Authorisers
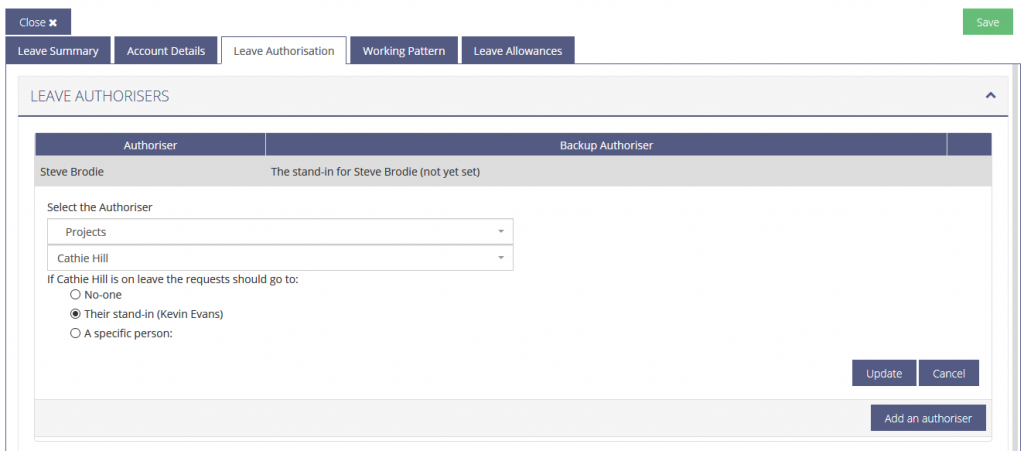
Here you can add an authoriser who will need to approve requests for this employee. You can add multiple authorisers, and this will require that all authorisers accept the request before it is granted. You will notice that there is a second column for backup authoriser; this is someone who can approve the requests if the main authoriser is absent themselves. To add an Authoriser for this employee, click ‘+ Add an authoriser’ and you will see the ‘Add this Authoriser’ window appear with the following options:
- Select the Authoriser – Choose the person who will authorise the current employee’s requests. You can filter by department.
-
Action if authoriser is on leave – Decide what happens when your selected authoriser is on leave.
- No-one – The request will wait until the chosen authoriser returns from leave. Administrators are able to accept any requests if required.
- Their stand-in – Select to choose the default Stand-in for this authoriser (this is set on the authoriser’s manage user page).
- A specific person – Choose an individual, who wouldn’t normally by the stand-in for this authoriser.
When you have finished hit ‘Add this Authoriser to return to the Leave Authorisers page.
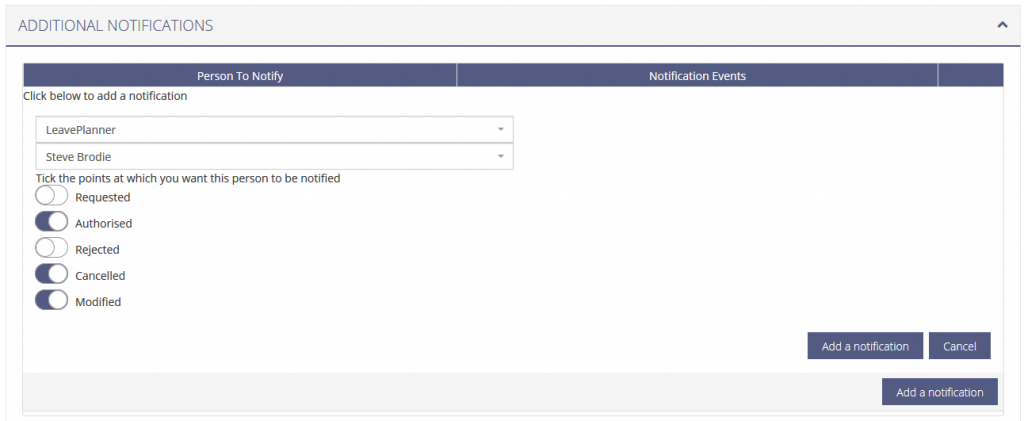
Additional Notifications
Use this option to add an additional person to be notified regarding the current employee. The default persons will still receive notifications without adding anyone in here. Use this setting if you want to notify another employee who is not the requester or an authoriser. You can select a user in the same way that you add an authoriser. The notifications are triggered based on selecting from the following events in LeavePlanner:
- Requested – As soon as a user submits a request.
- Authorised – When leave has been approved for this user.
- Rejected – If a request has been denied by an authoriser.
- Cancelled – When a request is deleted.
- Modified – If part of the request is removed.
A good example of this feature in practice is where you might have an employee with a supervisor and a line manager. The line manager is responsible for their leave so will be their authoriser, but you want LeavePlanner to keep the supervisor informed with any with any authorised requests and any leave cancellations.
Authorisation Stand-In
This only applies if the employee you are currently managing is an authoriser. People who act as an authoriser tend to go on leave themselves. Rather than your staff having to wait for them to return to authorise the leave requests, you can nominate other people to act on their behalf. There are two ways you can manage this:
- Nominate someone as backup authoriser on a per employee basis.
- Nominate someone to act as a stand-in for the authoriser.
Using the stand-in option will reduce the amount of administration required. This is because, should you need to change the backup authoriser, you only need to update the stand-in authoriser to another person, rather than changing the specific person backup for each employee.
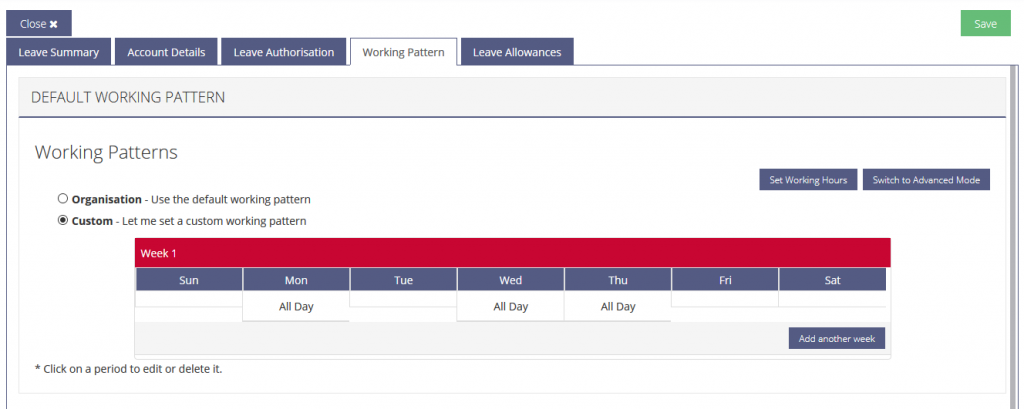
Working Pattern
You can use the Working Pattern screen to match someone’s rota to the LeavePlanner system. When you input the pattern that the user works, LeavePlanner uses the employee�s working days for the planner display. The pattern is also used to calculate allowance accrual for pro-rata calculations and leave required for requests.
Simple Mode
In the simple mode you can choose between the default organisation working pattern, or a custom working pattern for this individual employee. If you select custom, you can change the working pattern by adding new work periods (hover on the requested day), or modifying work periods by right-clicking the current value and choosing either edit or delete.

Advanced Mode
If you are setting a working pattern to custom, you can use the advanced mode to have even more control over the patterns. You can change the working pattern by adding new work periods (hover on the requested day), or modifying work periods by right-clicking the current value and choosing either edit or delete. In this mode you can define future changes to the working pattern and LeavePlanner will use the correct patterns for future requests. For example, you may have a user that as of 04/07 is changing to working on Saturdays, hit the ‘Define a new period’ button and use the calendar select icon to choose 4th July, hover on Saturday and add the All Day work period. When you save this pattern it will be added to the ‘Working Periods’ list on the left and will be named with the date range that it applies to.

Leave Allowances

Public Holiday Settings
You are able to define Public Holidays on an individual basis, by default all employees will be set to Organisation, if you want to configure different back holidays for a specific person you have the following options:
- Organisation – The default, this uses whatever you have set in ‘Organisation Settings’.
- Regional – Define new bank holidays for a region in ‘Organisation Settings’ to get this option.
- Department – If you have set this employee’s department with specific bank holidays (or regional ones) you will have this option.
- None – If this employee works on public holidays (or they are part of the allowance) then choose this option.
Holiday Allowance
Here you can make changes to the default allowance granted to this employee. You have the following settings:
- Default allowance – This is the allowance given to the employee when they started (LeavePlanner will calculate accrual for any new starter or leaver).
- Auto-repeat allowance – This will automatically fill the next leave period with the allowance for this employee.
- Increase it by – Choose this if you increase this employees allowance for each year they have been with the company.
- …up to a maximum of – Choose a maximum allowance if you are using an incremental allowance.
- Up to … can be carried over – Allow this employee to carry some of their allowance into the next leave period.
- Auto-expires after – Define how long you allow a user’s carried leave to last before expiring.
Underneath these settings you will see the Allowances for different leave periods that LeavePlanner has calculated based on this employees settings.
Custom Leave Allowance
If your organisation has defined Custom Leave that has an allowance, then you will receive additional settings here for that leave type. The settings for Custom Leave Allowance are exactly the same as Holiday Allowance:
- Default allowance – This is the allowance given to the employee when they started (LeavePlanner will calculate accrual for any new starter or leaver).
- Auto-repeat allowance – This will automatically fill the next leave period with the allowance for this employee.
- Increase it by – Choose this if you increase this employees allowance for each year they have been with the company.
- …up to a maximum of – Choose a maximum allowance if you are using an incremental allowance.
- Up to … can be carried over – Allow this employee to carry some of their allowance into the next leave period.
- Auto-expires after – Define how long you allow a user’s carried leave to last before expiring.
Underneath these settings you will see the Allowances for different leave periods that LeavePlanner has calculated based on this employees settings.