3.1.1 – Enabling Single Sign On
LeavePlanner allows you to use an external login system that implements the OpenID standard, such as Microsoft 365 or Okta, to replace the LeavePlanner login accounts. Below is a walk-through on how to set this up with Microsoft 365 / Azure.
- Log into LeavePlanner under the normal web address and navigate to Organisation Admin > Organisation Settings. Scroll down to the bottom of the first tab until you reach the ‘Single Sign On’ section and click on the toggle for ‘Enable Single Sign On’ as below:

The first field you will see is the ‘Application Url’. This is a unique web address for just your company to use, which you need to enter something that will be simple to remember for your employees. We recommend entering your company name, or of you have a long company name then you can just use initials. (e.g. instead of ‘My Long Company Name’, just enter ‘mlcn’)
When you save your settings LeavePlanner will check to ensure that no-one else has already used that Url, so if you receive a message that it is unavailable then you will need to use something else.
The next field, ‘OpenID Authorization Flow’, determines how LeavePlanner will communicate with your SSO system. Which option you choose will be dependent on what is supported by your SSO system, although we recommend you use the first option ‘Authorization Code’.
At this point you should click on ‘Save Changes’ before continuing to setting up in Office 365 - Next, open a new tab in your browser and navigate to https://aad.portal.azure.com and login as an Administrator
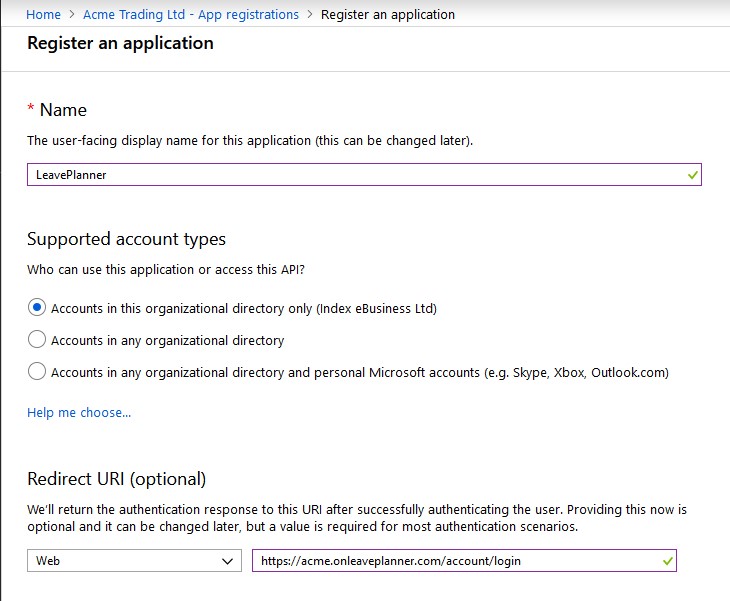
Navigate to ‘Azure Active Directory’ > ‘App registrations’ and click on ‘New Registration’ to get the following form:
- For the Name field just enter ‘LeavePlanner’ and you can set the supported account types to whatever suits your needs.
- For the Redirect URI enter the following: https://<your application url>.onleaveplanner.com/account/login (replacing ‘<your application url>’ with what you set in the first step for the Application Url)
- Click on ‘Register’
- Once the Azure portal has registered the new App you will then be presented with the following overview:

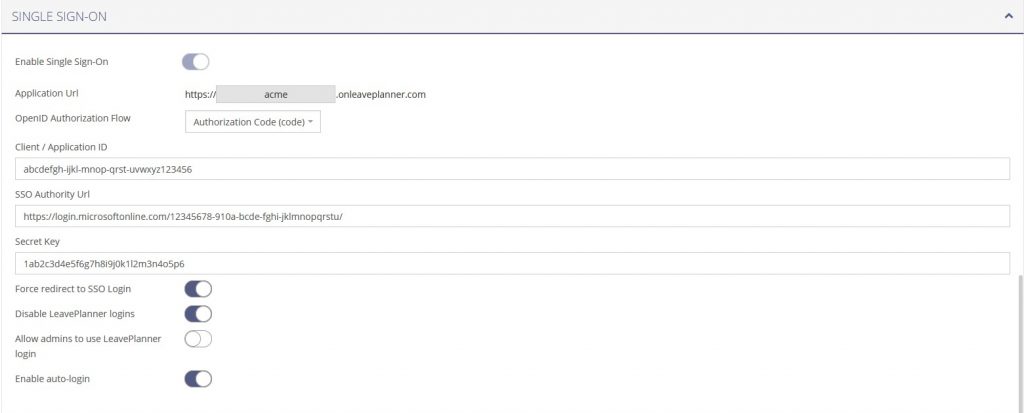
Copy the ‘Application (client) Id’ (click on the icon to the right of the text which will ‘copy to the clipboard’) and then switch back to LeavePlanner and paste it into the ‘Client / Application ID’ field
Switch back to the Azure Portal and copy the ‘Directory (tenant) ID’. Switch again to LeavePlanner and now enter the following into the ‘SSO Authority Url’https://login.microsoftonline.com/
and then paste your tenant ID onto the end (e.g. https://login.microsoftonline.com/12345678-910a-bcde-fghi-jklmnopqrstu)
Switch back to Azure again and navigate to the ‘Certificates & Secrets’ section.
Click on ‘New client secret’ to view the following form:
Enter anything meaningful in the Description field and select how when you want the secret to expire (you can choose ‘Never’ for ease of maintenance)
Click on ‘Add’ and you will be presented with the new secret key as below:
Copy this text, switch to LeavePlanner again and enter it in the ‘Secret Key’ field. Your Single Sign On Settings should now look like the image below:
Click on ‘Save Changes’ - You are now ready to test logging in. Before you do, you must ensure that your account username in LeavePlanner EXACTLY matches your username in Azure. You can check this by navigating to User Admin > Manage Users in LeavePlanner and finding your account.
If you did not log into the Azure Portal with the same account that you are testing your LeavePlanner login, then you will need to log out of the Azure Portal before proceeding with the next step
Once you have verified that the usernames match, open a new tab and enter the Application Url you entered in the address bar (e.g. https://acme.onleaveplanner.com) and you will be presented with a login page as below:
- Click on the ‘Login with Single Sign On’ button and, if you are not already logged in, you will be presented with the Microsoft login page
- Enter your Microsoft login details as normal and you should then be passed back to LeavePlanner and automatically logged in.
If there are any issues with logging in you will be presented with an error on the LeavePlanner Login page. If you need help then please do contact the LeavePlanner Support Team.
- Navigate back to Organisation Admin > Organisation Settings to optionally activate additional settings:

- Force redirect to SSO Login This will redirect anyone who attempts to login via the normal LeavePlanner login page to your Application Url
- Disable LeavePlanner logins This will prevent your employees from logging in with their LeavePlanner username and password and force them to login with their SSO account
- Allow Admins to use LeavePlanner login This allow any system administrators to continue to use their LeavePlanner login details as a backup login method
- Enable Auto-login This will automatically attempt to login via the SSO login system whenever someone loads the LeavePlanner login page. If they are successfully logged in they will be redirected back to the LeavePlanner dashboard
Please note – if you enable this option then logging out of LeavePlanner will not log you out of your SSO account. Consequently you will be automatically logged back in again if you try to log out of LeavePlanner.
